Every chapter has an outline: a summary, the plot points it has to hit, its scenes, and notes on character, theme and conflict. You build it in the Story Planner, and it follows you into the Manuscript Editor so your plan is beside you while you write.
What's in an outline
The Notes Panel shows an outline in these sections. The Story Planner uses slightly different names for some of them, shown in brackets.
Chapter Summary: what happens in the chapter, in a few lines.
Key Plot Points (Plot Points): the developments the chapter must deliver, in order.
Scenes: the chapter's scenes, each with its own summary, setting, characters, point of view, mood, beats and more.
Character Development (Character Arcs): for each character, a development goal and their emotional state in this chapter.
Themes, Conflicts and Foreshadowing: short lists.
Additional Notes (Outline Notes): anything else.
Editing the full outline in the Story Planner
This is the only place to edit every part of the outline.
1. Open the chapter
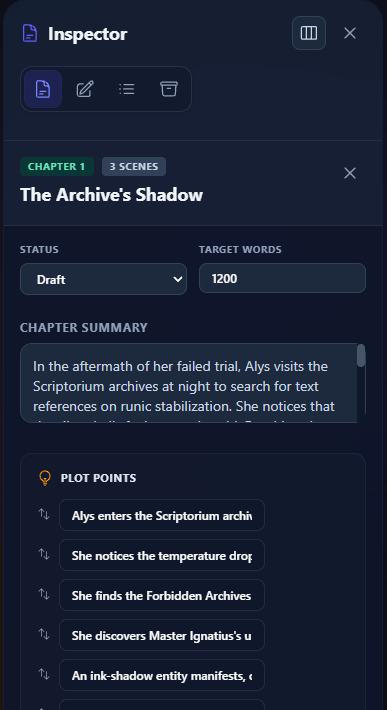
Go to Storyboard under Book Planning and click the chapter's header. It opens in the Inspector's Details tab.
2. Fill in the sections
Type the Chapter Summary. It saves a moment after you stop typing.
Click Add Point for each plot point. Press Enter in a plot point to start the next one. Drag the handle, or use the arrows, to reorder them.
Click Add Character Arc, then fill in Character name, Development goal and Emotional state.
Use the + next to Themes, Conflicts or Foreshadowing to add an item.
Write anything else under Outline Notes.
You can also set the chapter's Status and Target Words here. The target is used by the chapter goal in the Word Count widget and by the pacing chart in Analytics.
3. Add scenes
Scenes are added on the Storyboard itself: click + Add Scene in the chapter's column, then click the scene card to fill it in. See Storyboard.
Viewing and editing while you write
In the Manuscript Editor, open the Notes Panel and choose the Chapter Outline tab. It shows the outline of the chapter you're writing, with each section collapsed so you can open just what you need. Sections you haven't filled in are hidden. Click a scene to see its details.
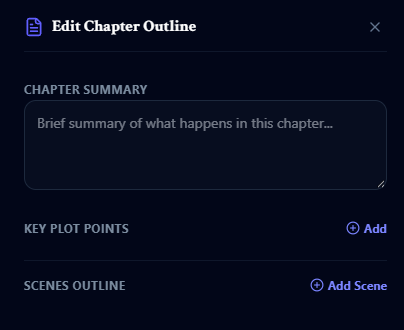
To make changes without leaving the editor, click Edit Full Outline at the bottom of the tab. The Edit Chapter Outline drawer opens on the right, where you can edit:
Chapter Summary.
Key Plot Points: click Add for another, or the bin to remove one.
Scenes Outline: click Add Scene, then fill in the scene's title, what happens, Setting, POV Character, POV Type, Status, Target Words, Mood / Tone, Narrative Purpose, POV Notes, Characters in Scene (separated by commas) and Scene Beats.
Click Save Outline when you're done. Changes in the drawer aren't saved until you do.
Character Development, Themes, Conflicts, Foreshadowing and Additional Notes aren't in the drawer. Edit those in the Story Planner. Saving the drawer leaves them as they are.
For more on the Notes Panel, see Notes Panel Guide.
Scenes that aren't in a chapter yet
Not every scene idea has a home straight away. In the Story Planner, a scene can be unassigned: it belongs to the book but not to any chapter, so it isn't part of any chapter's outline and doesn't show in the Notes Panel.
To see them, open the Inspector's Unassigned Scenes tab.
To add one, click + on that tab. It starts with the status Idea.
To set a scene aside, drag it out of its chapter onto the Drop here to unassign scene area, or onto the Unassigned Scenes tab icon.
To give it a chapter, drag it from the tab onto the chapter's column on the Storyboard. It then becomes part of that chapter's outline.
Free plan limit
On the Free plan, you can outline up to 5 chapters in each book. A chapter counts as outlined as soon as it has a summary or at least one scene. Chapters you've already outlined stay editable; the limit only stops you outlining a sixth. When you reach it, you'll see Chapter Outline Limit Reached.
The Free plan also allows 5 scenes per book, counting unassigned scenes. See Story Planner Overview.