The Story Planner is where you shape your story before and while you write it. It gives you four ways to look at the same plan: a board of chapters and scenes, a calendar of events, a grid of plot threads, and a branching Snowflake outline. Everything you plan here is tied to your real manuscript, so your chapters, scenes and outlines stay in step wherever you look at them.
Opening the Story Planner
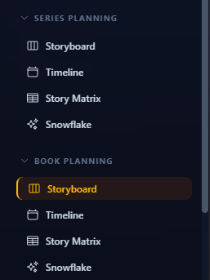
Open a book or series and use the planning links at the top of the project sidebar. There are two groups:
Book Planning plans the book you have open: its chapters, scenes and events.
Series Planning plans the whole series, one level up: books instead of chapters, and events instead of scenes. This group only appears when the book belongs to a series, or when you're in the Series Hub.
Each group has the same four views: Storyboard, Timeline, Story Matrix and Snowflake. You can also click the Story Planner card on your book's home page, or Series Board in the Series Hub.
The Story Planner needs a larger screen. On a phone you'll see Optimized for Desktop instead, with a button to go to the Manuscript Editor, where you can still read and edit your chapter outlines.
The four views
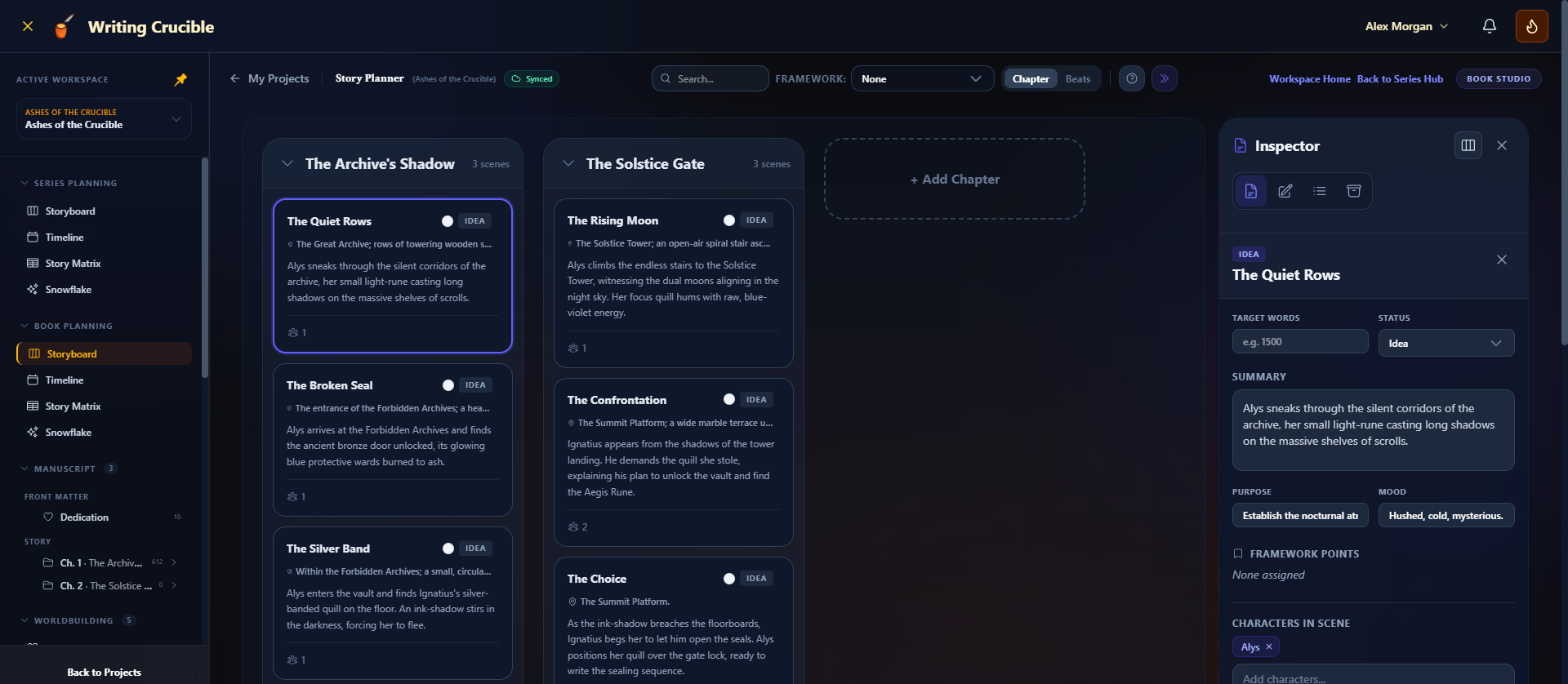
Storyboard: a column for each chapter with its scenes as cards. Drag scenes between chapters, reorder chapters, and line scenes up against a story structure such as Save the Cat! See Storyboard.
Timeline: your story's events on a calendar, including fantasy calendars with your own months, weekdays and moons. See Timeline.
Story Matrix: a grid with chapters across the top and plot threads down the side, so you can see where each storyline appears. See Story Matrix.
Snowflake: a branching map that grows from a one-sentence summary into books, chapters, scenes, events and worldbuilding. It exports to Markdown and PDF. See Snowflake.
The toolbar and the Inspector
The controls along the top of the planner apply to whichever view you're in:
Search... fades out the cards that don't match, so the matching scenes stand out. It looks at scene titles, summaries, characters, settings and purpose.
Framework: picks a story structure, such as Three-Act Structure, A Hero's Journey or Romancing the Beat. Choose None to plan freeform.
The Chapter / Beats switch (Book / Beats in Series Planning) changes the columns from chapters to the beats of your chosen framework.
The question mark restarts the guided tour for the view you're in.
The arrow button at the end shows or hides the Inspector.
The Inspector is the panel on the right. Click any scene, chapter or event to edit it there. Its tabs are Details, Sticky Notes, Plot Threads and Unassigned Scenes. Drag its left edge to resize it, or click the column button to show two tabs side by side.
How planning connects to your manuscript
The planner doesn't keep a separate copy of your book. It works on the real thing:
Chapters are your manuscript chapters. Adding a chapter in the planner adds it to your book, ready to write. Reordering chapter columns reorders your manuscript. Deleting a chapter from the planner deletes it from your book, text included.
Only the story is planned. Front and back matter, like a title page or acknowledgments, don't appear in the planner.
Scenes live in the chapter's outline. A scene you add to a chapter on the Storyboard shows up under Scenes in that chapter's outline, in the Notes Panel's Chapter Outline tab while you write, and under the chapter in the sidebar. See Chapter Outlines.
Unassigned scenes are scene ideas that don't belong to a chapter yet. They wait in the Inspector's Unassigned Scenes tab until you drag them into a chapter.
How planning connects to worldbuilding
There are two places where the planner and your worldbuilding meet.
Characters and settings on scenes
When you edit a scene, Characters in Scene, Setting and POV Character suggest the characters and locations from your book's worldbuilding (and its series', if it has one). If you type a name that doesn't exist yet, click Create "name" to add it to your worldbuilding as a new character or location and attach it to the scene in one step. You can add tags at the same time by typing them after the name, separated by commas.
Worldbuilding nodes on the Snowflake
On the Snowflake you can add worldbuilding elements as nodes. Click one and the Inspector shows that element as it stands at that point in the story, worked out from where the node sits:
Under a chapter node: the element as of that chapter.
Under a book node: the element at the start of that book.
Anywhere else: the element at the start of the story.
If the element doesn't already have a version that starts at exactly that point, Writing Crucible creates one for you, named like Book 1 Chapter 4 State, copied from the version before it. Edits you make in the Inspector are saved to that version, so changing a character's details under Chapter 4 doesn't rewrite who they were in Chapter 1. The version box at the top of the Inspector shows which version you're editing.
This means just clicking a worldbuilding node can add a version to that element. On the Free plan, which allows 10 worldbuilding versions in total, Writing Crucible won't create a new one once you're at the limit. It shows the nearest existing version instead, and your edits change that version. To learn how versions work, see Worldbuilding Versioning.
Plans and limits
Every plan can use all four views. On the Free plan, each book has these limits:
5 scenes, counting unassigned scenes.
10 timeline events. In Series Planning, the count includes the series' events and every book's events.
5 outlined chapters. A chapter counts as outlined once it has a summary or at least one scene.
When you reach one, you'll see a message such as Scene Limit Reached; click Upgrade Plan in it to see the plans. The limits apply everywhere in the planner, including things you create from the Snowflake. Paid plans remove these limits, and so does the 14-day free trial. See Free Trial, Upgrading and Cancelling.