A book is more than its chapters. Writing Crucible lets you add a title page, a dedication, a prologue, parts, acknowledgments and more, and keeps each one in the right part of the book. Chapters are numbered for you, so adding or moving one never leaves a gap.
The three parts of a book
Every section belongs to one of three parts, always in this order:
Front matter: title page, copyright, dedication, epigraph, contents, and a foreword, preface or introduction.
Story: prologue, chapters, parts, interludes and epilogue.
Back matter: afterword, acknowledgments, about the author, also by, and anything else that follows the story.
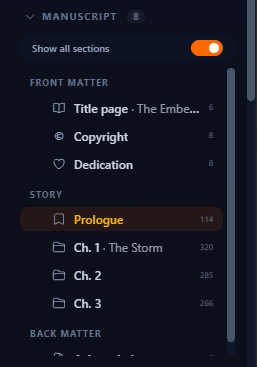
Once a book has any front or back matter, the sidebar's Manuscript list and the Workspace Home list group its sections under Front matter, Story and Back matter headings.
Add a section
Click Add section above the Manuscript list on your book's Workspace Home. Or, in the sidebar, hover over the Manuscript heading and click the + button.

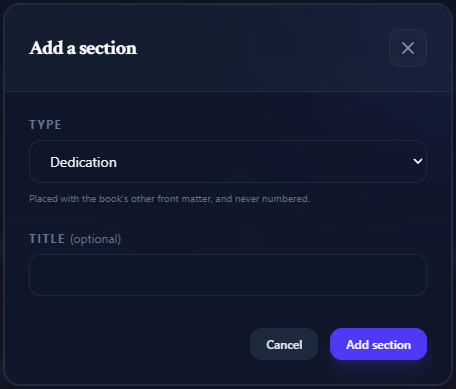
In the Add a section dialog, choose a Type. The list is grouped into Front matter, Story and Back matter.
Optionally, give it a Title. Chapters don't need one: "Chapter 4" is their label. Types such as Foreword or Acknowledgments fill in their usual title for you, which you can change.
Click Add section. The new section opens in the editor. A title page, copyright page or contents page opens as a form or a preview instead (see below).
Where each type goes
You don't need to place sections yourself. The hint under Type tells you what will happen:
Chapters are numbered for you; other story sections are not. A new chapter is added at the end of the story, before any back matter, and gets the next number. A prologue goes at the start of the story. Parts, interludes and an epilogue go at the end of the story and are labelled by name rather than numbered.
Placed with the book’s other front matter, and never numbered. Front matter is kept in the usual order: title page, copyright, dedication, epigraph, contents, then a foreword, preface or introduction. A title page added later still goes first.
Placed with the book’s other back matter, and never numbered. Back matter is added at the very end of the book.
One per book
A book can have only one Title page, one Contents page and one Prologue. Once your book has one, that type is greyed out in the dialog and marked (this book has one).
The contents page
You don't type a contents page. Open your Contents section and you see the list, made from your sections, so it stays up to date as you add, rename or move them. Your exports and your beta readers get the same list.
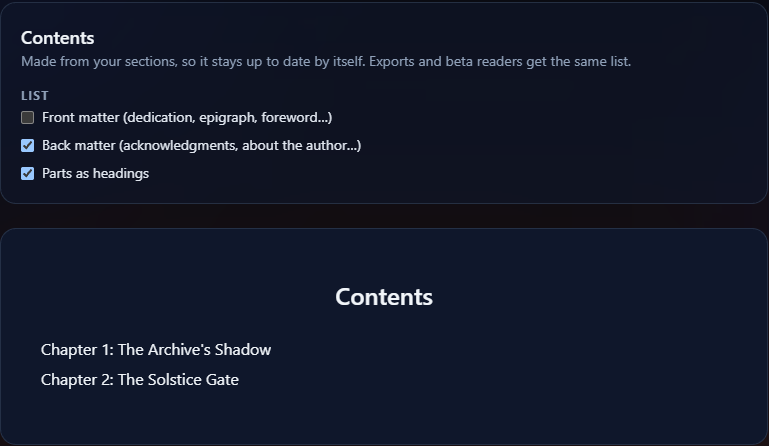
The title page, the copyright page and the contents page itself are never listed. Under List, tick what else goes in:
Front matter (dedication, epigraph, foreword…): the rest of your front matter. Off to begin with.
Back matter (acknowledgments, about the author…): on to begin with.
Parts as headings: each part is a heading, with the sections after it listed under it. On to begin with. Untick it and the parts are left out, with their chapters listed on their own.
Your choices are saved as you tick them.
If you typed a contents list into this section before, or imported one, it's kept with the section. Click Show the contents typed here before to read it.
The contents page has no editor toolbar, so Notes, Export DOCX and Export PDF buttons sit at the top of the page instead. The same goes for the title page and copyright page forms.
The title page
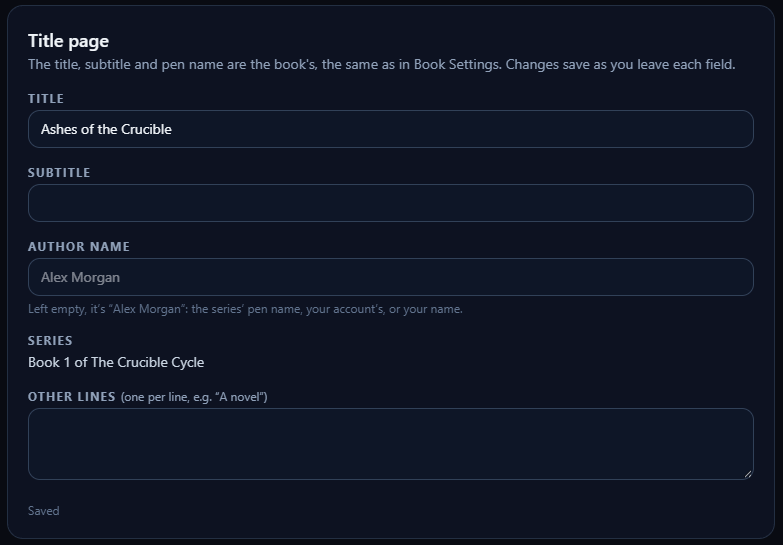
A new or empty title page opens as a form. Fill it in and the page is laid out for you, with a preview below the form. Changes save as you leave each field. If a change would take you over your plan's word limit, it isn't saved: you'll see the plan limit message, and the form says That change wasn’t saved. Please try again. The same goes for the copyright page.
Title: the book's title. Changing it here renames the book.
Subtitle: the book's subtitle, shown in italics under the title.
Author name: this book's pen name. Leave it empty to use the series' pen name, your account's pen name or your name, in that order. The hint under the field shows which name will be used.
Series: for a book in a series, a line such as "Book 2 of The Crucible Cycle", made from the series. You can't edit it here.
Other lines: anything else, one per line, such as "A novel". Up to 10 lines.
The title, subtitle and pen name belong to the book, so they're the same fields as Book Title, Subtitle and Pen Name in the book's Settings. Change them in either place and the title page follows. The series' pen name is set in Series Settings, and your account's in Settings, on the Profile tab. When you change one of those, your books' title pages are updated as it saves. If any couldn't be, you're told how many: save again to retry, or open the book, which updates it too.
If your title page already has text, for example from an import, it opens as the form when every line has a place on it. If not, it stays as your own text in the editor, with a note at the top. Click Use the form to switch. Your text is kept in Versions first.
The copyright page
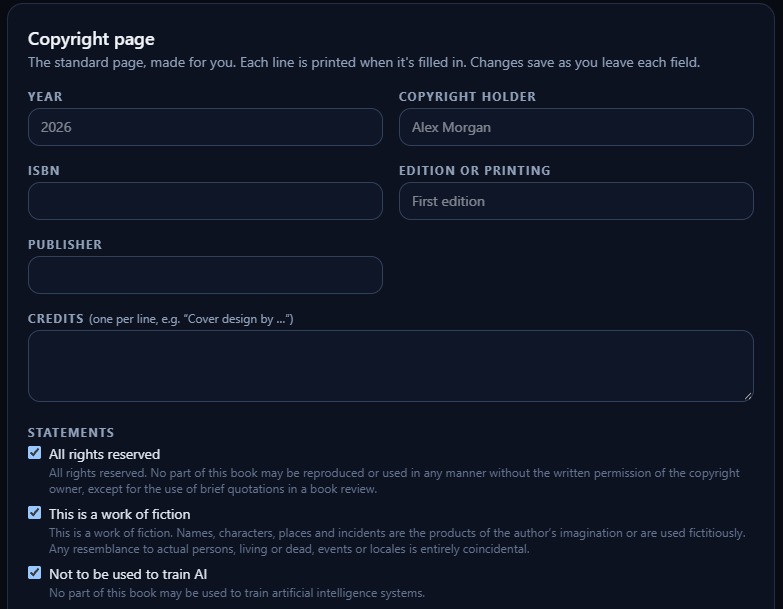
A new or empty copyright page opens as a template: you fill in the details and the standard copyright page is made for you. Each line is printed only when it's filled in, and changes save as you leave each field.
Year: this year if you leave it empty.
Copyright holder: the name on your title page if you leave it empty.
ISBN: the book's ISBN, the same one as in the book's Settings.
Edition or printing: for example "First edition".
Publisher
Credits: one per line, such as "Cover design by …". Up to 20.
Statements: All rights reserved, This is a work of fiction and Not to be used to train AI, each with its full wording shown. All three are ticked to begin with; untick any you don't want.
Note: anything else, printed line by line at the end.
The page starts with "Copyright ©" followed by the year and the holder, then the ticked statements, the ISBN, the edition, the publisher, your credits and your note.
A copyright page that already has text stays as your own text, with a note offering the template. Click Use the template to see what it will take from your text: the year, the holder, the ISBN, and everything else word for word as the note. Lines that are one of the standard statements are left out of the note, because the statement switches print them. Click Apply to use the template, or Cancel. Your text is kept in Versions first.
Change a section's type
Open the section in the editor and use the Type: menu at the top of the page. This menu lists the underlying types (Front matter and Back matter cover forewords, acknowledgments and the like), plus Section for a story section that isn't a chapter.

If the new type belongs in a different part of the book, the section moves there: a dedication changed to a chapter joins the story, and chapters are renumbered. Your text is saved first and isn't changed.
Which sections count toward your word count
Only the story (prologue, chapters, sections, parts, interludes and epilogue) counts toward your book's word count and its writing analytics. Front and back matter don't, so a long acknowledgments page won't inflate your book's total.
To change this for one section, open it in the editor and tick or untick Counts at the top of the page, next to Type:. If you change a section's type, it follows the new type's rule unless you've set Counts yourself.
Your plan's word limit is separate: it counts the words in every section, front and back matter included, whether Counts is ticked or not. Unticking Counts changes your book's total, not how much of your plan you've used.
What beta readers see
Each section has a Beta setting at the top of the editor, next to Counts. It decides what your beta readers can do with that section:
Feedback: they can read it and give feedback.
Read only: they can read it, but there's no feedback form and no feedback is asked for.
Hidden: they don't see it at all, whatever its status.

Until you choose, a section follows its type: the story starts as Feedback, and front and back matter start as Hidden, so nothing outside the story reaches beta readers unless you say so. A section still only reaches them once its status is Beta or Complete. A contents page shown to beta readers lists only the sections they can see. Working with beta readers has its own article.
Story tools in front and back matter
Front and back matter aren't part of the story, so they don't get the story's tools: the Notes Panel has no Chapter Outline tab, the Word Count widget has no chapter goal, and typing / doesn't open Continue Writing. A contents page has no Word Count widget at all.
Page looks
Some types change how the page looks in the editor, so you can see what you're writing:
Title page (one you've written yourself, not the form): centred and set lower on the page, with its title shown large above the text.
Dedication and Epigraph: centred and in italics.
Copyright (one you've written yourself, not the template): smaller text.
This is display only. Your text isn't rewritten, so changing a section's type restyles it straight away.
Reorder sections
In the sidebar's Manuscript list, hover over a section and drag it by the handle on its left (Drag to reorder). Chapters are renumbered to match the new order.
A section always stays in its own part of the book. If you drop your acknowledgments between two chapters, they go to the start of the back matter instead.
With more than five sections, the sidebar shows only the five you edited most recently, under Recently edited. This short list isn't in book order. Turn on Show all sections to see the whole book in order and drag sections around.
Chapter status
Each section has a status you can use to track your progress: Created, Outlined, Draft, Beta or Complete. Change it from Status: at the top of the editor, or from the status button beside each section on Workspace Home.
Rename or delete a section
Any section, including front and back matter, can be renamed or deleted from the editor:
Open the section in the editor and click the Rename or delete this section button (⋯) at the top of the page, next to Status:.
To rename it, change the Name and click Save name.
To delete it, click Delete this section…, then Delete section. Its text and saved versions are deleted too, and this can't be undone. Click Keep it if you change your mind. The remaining chapters are renumbered.
You can also rename and delete chapters and other story sections from the Story Planner: in the sidebar, under Book Planning, click Storyboard (see Storyboard), click the chapter, and edit its title or click Delete Chapter at the bottom of the panel. The Story Planner only shows the story, so front and back matter don't appear there.
Related articles
Importing a Manuscript: front and back matter are detected for you when you import.
Exporting Your Manuscript: how sections appear in DOCX and PDF files.